How to Install and Activate a Datapang eSIM: Your Complete Guide
Complete step-by-step guide for first-time eSIM users to purchase, install, and activate a Datapang eSIM. Covers phone preparation (unlock status, compatibility check, Wi-Fi requirement), buying process (destination selection, data amounts, payment), installation methods (direct QR code, manual), and activation at destination. Includes device-specific instructions for iPhone and Android, comprehensive FAQ, and 24/7 support contact options.

Ready to stay connected in 200+ destinations?
Your Datapang eSIM is about to transform your travel. No airport lines. No searching for SIM cards. Just instant internet when you land.
Bought your Datapang eSIM? Perfect. You're just a few minutes away from staying connected anywhere in the world.
Whether this is your first time using an eSIM or you're a frequent traveler, this guide will walk you through everything you need to know. From installation to activation, so your eSIM is ready when you need it.
Got 5 minutes? That's all you need. Let's go.
Before You Start
Before installing your Datapang eSIM, make sure you meet these requirements:
✅ Your phone supports eSIM
✅ Your phone is carrier unlocked (SIM unlocked)
✅ You have a stable Wi-Fi connection
✅ You have received your Datapang eSIM QR code or activation details
Not sure about any of these?
Pro tip: We recommend installing your eSIM before you travel while you're still connected to reliable Wi-Fi. Most Datapang eSIMs only start their validity once they connect to a supported network at your destination. This means you can install days early and your data won't start until you land.
Still worried? Message us on WhatsApp. We'll confirm everything is ready in under 5 minutes.
What's the Difference Between Installing and Activating an eSIM?
Many first-time users confuse these two steps. Here's the difference:
Installing
Installing simply downloads the eSIM profile onto your phone.
Think of it as downloading an app. You've added it to your device, but you haven't started using it yet.
Zero data is used. Your plan hasn't started.
Activating
Activation happens when your eSIM connects to a supported mobile network (or according to your specific plan's activation policy).
This is when your data plan begins.
For most Datapang eSIMs, activation happens after you arrive at your destination and connect to a supported network. Your data counter starts ticking only when you turn it on in your destination country.
When Should I Install My Datapang eSIM?
The best time is before your trip.
We recommend installing your Datapang eSIM:
• At home before departure (best option)
• At the airport using Wi-Fi
• The night before your flight
Why before your trip?
If something goes wrong during installation, you have time to contact support and fix it. Datapang support responds in under 5 minutes via WhatsApp, even at night.
Avoid waiting until after landing if possible. You may not have Wi-Fi available when you arrive, and if installation fails, you're stuck without internet.
When Should I Activate My Datapang eSIM?
For most Datapang eSIMs:
Install before departure
Activate (turn on) after arriving at your destination
However, some plans activate immediately after installation.
Always check your Datapang product page or installation instructions for your specific eSIM.
You'll find this info in your confirmation email.
How to Install a Datapang eSIM on iPhone
Takes about 2-3 minutes.
1. Connect to Wi-Fi at home or the airport.
2. Open Settings on your iPhone.
3. Tap Cellular or Mobile Service.
4. Tap Add eSIM or Add Cellular Plan.
5. Tap Scan QR Code (or select "Enter Manually" if scanning fails).
6. Scan the QR code from your Datapang order confirmation email.
- If QR scanning fails, tap "Enter Manually" and copy-paste the activation details from your email instead.
7. Follow the on-screen instructions. Your iPhone will walk you through each step and ask you to confirm.
8. Label your eSIM (optional but helpful). For example, "Datapang Korea" or "Travel eSIM." This makes it easier to switch between SIMs later.
Done. Your eSIM is now installed. You can leave it turned off until your trip. No data will be used.
How to Install a Datapang eSIM on Android
The steps vary slightly depending on your device, but generally:
1. Connect to Wi-Fi at home or the airport.
2. Open Settings.
3. Go to Connections or Network & Internet (varies by manufacturer).
4. Open SIM Manager or Mobile Network.
5. Tap Add eSIM or Download SIM.
6. Scan your Datapang QR code using your phone's camera.
- If QR scanning fails, tap "Enter Manually" or "Enter Details" and copy-paste the activation code from your Datapang email.
7. Follow the prompts to download the eSIM profile.
8. Confirm installation. Once installed, your eSIM will appear in your SIM list.
Done. Your eSIM is now installed and ready. No data will be used until you activate it at your destination.
How to Activate Your Datapang eSIM
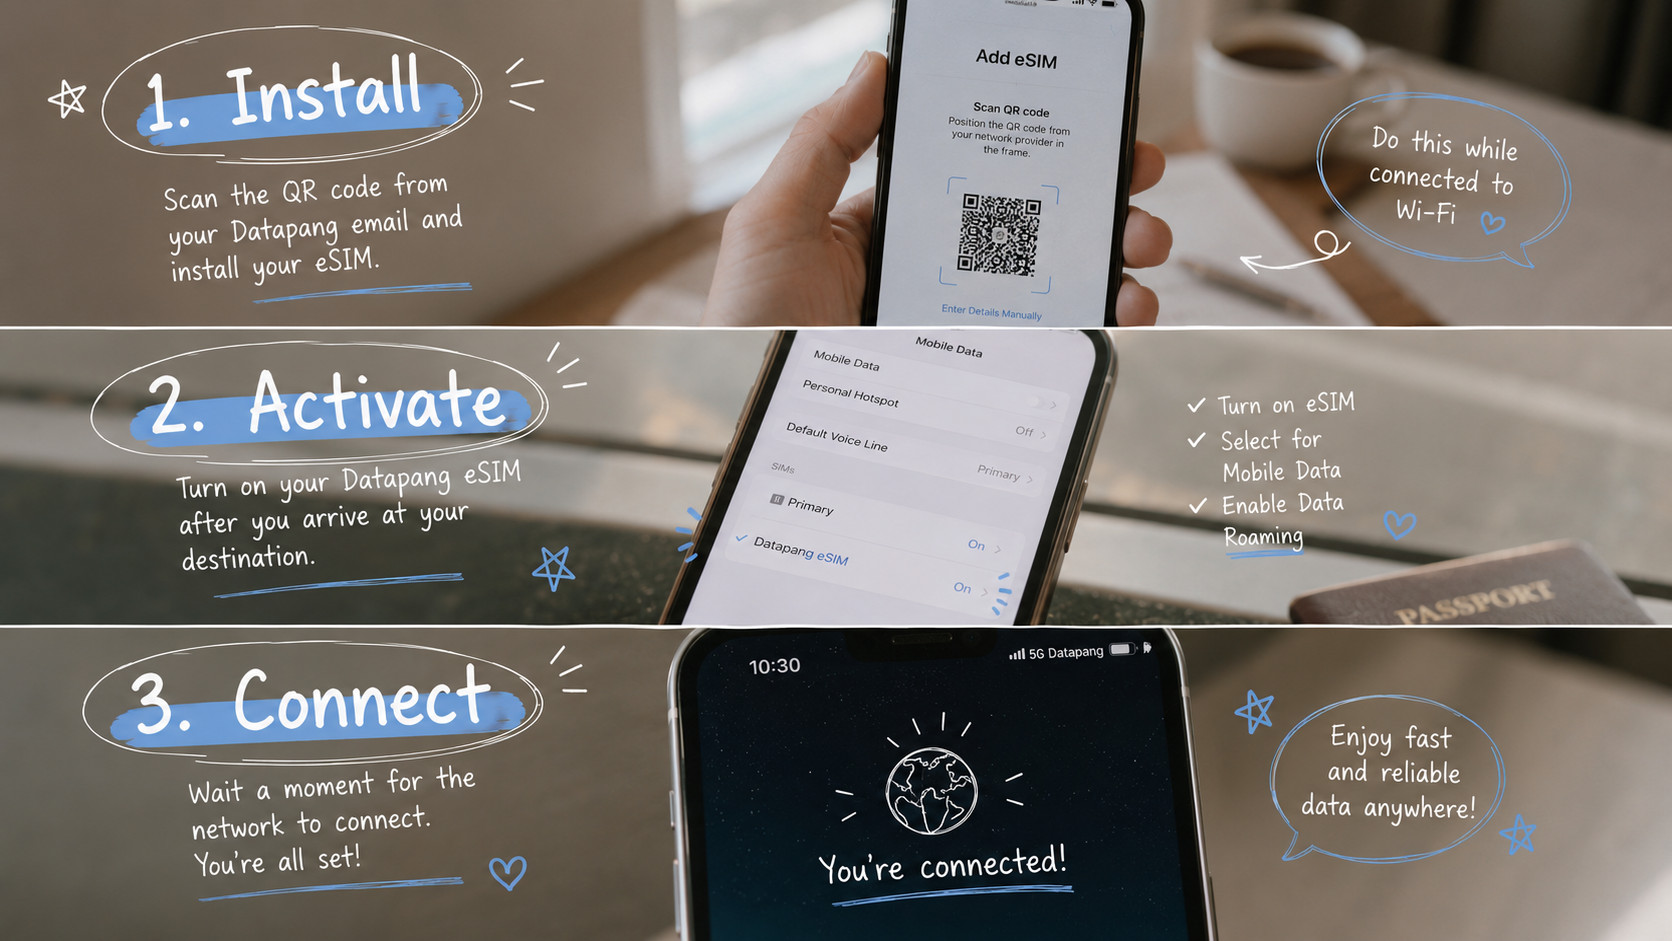
Once you've arrived at your destination:
1. Open Settings.
2. Go to Cellular/Mobile Service or Mobile Network.
3. Turn on your Datapang eSIM. Toggle the switch to ON.
4. Select the Datapang eSIM for Mobile Data. This tells your phone to use Datapang for internet (while keeping your home SIM for calls/texts).
5. Enable Data Roaming if required. Some networks require this. Check your Datapang activation instructions. They'll tell you if you need it.
6. Wait a minute or two for the network to connect. Your phone will search for and connect to the local mobile network.
You should now see signal bars and a data icon. You're connected.
Open WhatsApp, check your email, load Google Maps. Everything should work instantly.
What If My eSIM Doesn't Work Immediately?
Don't panic. This is completely normal. Most issues are fixed in under a minute.
Try these quick fixes:
• Restart your phone. Turn it off for 30 seconds, then back on.
• Make sure you're already in your destination country. Your eSIM won't connect outside your destination.
• Confirm your Datapang eSIM is turned on in Settings.
• Ensure Mobile Data is using the Datapang eSIM. Don't let your phone default to your home SIM.
• Turn Data Roaming on if your Datapang instructions require it.
• Toggle Airplane Mode. Turn it on for 10 seconds, then off. This refreshes your network connection.
• Wait a few minutes for the network to register. Sometimes it takes time.
• Make sure you're already in your destination country. Your eSIM won't connect outside your destination.
• Confirm your Datapang eSIM is turned on in Settings.
• Ensure Mobile Data is using the Datapang eSIM. Don't let your phone default to your home SIM.
• Turn Data Roaming on if your Datapang instructions require it.
• Toggle Airplane Mode. Turn it on for 10 seconds, then off. This refreshes your network connection.
• Wait a few minutes for the network to register. Sometimes it takes time.
Still not working?
Or message Datapang support immediately:
📱 WhatsApp
✉️ Email
We respond in under 5 minutes. Most issues are fixed by the time you finish your first coffee.
Frequently Asked Questions
💬 Can I install my Datapang eSIM before traveling?
Yes. In fact, we highly recommend it. Installing before departure helps you avoid setup issues after landing. Plus, your data doesn't start until you arrive, so there's zero risk.
💬 Will my data plan start immediately after installation?
Usually not. Most Datapang travel eSIMs begin when they first connect to a supported network in the destination country. This is good news because you can install early without wasting data.
Always check the activation policy on your Datapang product page before installing.
💬 Can I use my regular SIM card together with a Datapang eSIM?
Yes. Most modern smartphones support Dual SIM. You can use your physical SIM for calls and texts while using your Datapang eSIM for mobile data.
This is actually the most popular setup with travelers. You keep your original number active while Datapang handles internet.
💬 Do I need Wi-Fi to install my eSIM?
Yes. A stable internet connection is required to download the eSIM profile.
This is why installing at home is so important. Airport Wi-Fi is often unreliable.
💬 Should I remove my physical SIM?
No. You can usually keep your physical SIM installed and simply select the Datapang eSIM as your mobile data line. Your phone will use both simultaneously.
💬 What if installation fails?
Contact Datapang support immediately. We have solutions for failed installations. Message us on WhatsApp with a screenshot of your error, and we'll fix it.
💬 Can I reinstall my eSIM if I delete it?
Most Datapang plans allow multiple reinstalls. Check your product details to confirm.
💬 What if I lose my phone after installing the eSIM?
Your eSIM is specific to that device. It's not transferable. If you replace your phone, contact Datapang and we'll help you reinstall (if your plan allows reinstalls).
💬 Do I need to do anything special to use WhatsApp?
No. Once your eSIM is connected to the internet, WhatsApp, Instagram, TikTok, and all apps work exactly as they do at home.
💬 Is there a money-back guarantee?
Yes. If your Datapang eSIM doesn't work after installation, contact support and we'll refund you. Zero risk.
Ready to Travel?
Installing your Datapang eSIM only takes a few minutes, and doing it before your trip means you'll be connected as soon as you arrive.
No expensive roaming charges. No airport SIM lines. Just instant internet.
Whether you're traveling for business, vacation, or studying abroad, Datapang helps you stay connected from the moment you land.
Browse Plans for Your Destination
✓ 200+ destinations (Korea, Japan, Europe, USA, Asia, more)
✓ Plans from $0.77
✓ Instant activation (QR code)
✓ 24/7 multilingual support
✓ Money-back guarantee
Need Help?
Our customer support team is available 24/7 in English, Korean, and Japanese.
Message us:
📱 WhatsApp: Get instant help
💬 KakaoTalk: Talk to us
✉️ Email: datapang@ptsk.co.kr
Average response time: under 5 minutes.
Related Guides
You might also find these helpful:
Still Have Questions?
Reach out to Datapang support anytime. We're here 24/7.
📱 WhatsApp: Message us
💬 KakaoTalk: Talk to us
✉️ Email: datapang@ptsk.co.kr
We support you in English, Korean, and Japanese.
Safe travels. Stay connected. Enjoy your trip.